- Download dulu ppdnya
- Open System → Administration → Printing → New Printer, select Gutenprint parallel port #1, Enter device URL : epson:/dev/lp0 → Forward
- Select provide PPD file
- Select file eplq2180.ppd
- Printer Name : LQ-2180 → Apply
Saturday, January 30, 2010
How Setting Printer LQ-2180?
Wednesday, January 27, 2010
Install Epson LX-300 Printer at Linux Ubuntu
- Open System → Administration → Printing → New Printer, in select connection Device chose Gutenprint parallel port #1, chose that for printer epson, so as to Enter device URL emerged epson:/dev/lp0 → clicked Forward
- To printer driver chose provide PPD file
- Afterwards the direction would in file Epson-Dot Matrix-epson.ppd
- Give the name printer LX-300 and clicked Apply
- The clique in printer LX-300, the Make difference and his Model from Epson the Teat of Matrix Foomatic/epson to Epson the Teat of Matrix Foomatic/eps9mid with clicked the switch change
- To this time chose driver from “Select Printer from Databese” afterwards chose Epson → Forward
- In the Models part chose “Dot Matrix” whereas in the Drivers part chose “Epson the Teat of Matrix Foomatic/eps9mid” → Forward
- Afterwards chose “Use the new PPD (Postscript Printer Description) the USA is” → Forward
- Driver that just was used by → Apply
- So that results print better in the Printer Options part the difference resolution to 240x216.dpi. → Apply
Wednesday, January 20, 2010
Tutorial Setting Printer Canon Pixma iP1880, iP1700, iP1980
Setting Printer Canon iP1880, iP1700, iP1980 Printer Driver
- Install Driver
- Enter the folder driver ip1880 through terminal code: cd /home/ubuntu/Desktop/Printer/iP1880+iP1700
- install all file code : sudo dpkg -i *.deb
- Open System → Administration → Printing → New Printer, to Select Connection chose Canon ip1800 series USB #1 (clicked Forward)
- Printer driver chose Provide PPD file
- Aim at to /usr/share/cups/model/canonip1800.ppd
- Give the name of ip1880/ip1700/ip1980 → Apply
- Restart computer
- Open Applications → Accessories → the Terminal, afterwards type ordered along with: code : cd /usr/lib ( tekan Enter )
- Printer was ready to use.
code : sudo ln -s ./libtiff.so.4.2.1 ./libtiff.so.3
Tuesday, January 19, 2010
How Setting printer HP on Ubuntu Blankon
Sometimes the printer on the ubuntu install we have faced various obstacles, constraints vary widely depending on the specifications and types of printers that we use. Just as if we use the HP printer type, you do not be surprised when you finish installing the printer and try to not remove ink mengeprint. This requires a little setting in the following HP printers are the steps:
1. First install Turboprint
2. > Administration >> Printing">select System>> Administration>> Printing
> Administration >> Printing"> 3. Click 2 times on the printer icon that is used
4. Select printer Options
5. In the printouts Mode select 300 dpi, color, Black + color so that the printer can read the ink that will be issued.
Thursday, January 14, 2010
Setting Printer Canon Pixma IP 1000
When you setting printer canon pixma Ip 1000! How get install printer Canon IP 1000?
- Install Driver
- Enter the folder driver canon pixma iP1000 through terminal code: cd /home/ubuntu/Desktop/i255
- install all file whitch your download
- Open System → Administration → Printing → New Printer, to Select Connection chose Canon ip1000 USB #1 (clicked Forward)
- Select Printer from Database, chose Canon (clicked Forward)
- For Printer Models Choose PIXMA ip1000 Ver.2.50 (clicked Forward)
- Give the name of PIXMA_iP1000_Ver2.50 → Apply
- Printer was ready to us
Wednesday, January 13, 2010
How Install Printer Canon Ip1300?
When you will Install Printer Canon Ip1300. Can you read this article.
- Install Driver
- Enter the folder driver canon ip1300 through terminal code: cd /home/grin/Desktop/ip1300
- install all file
- Added symbolic link
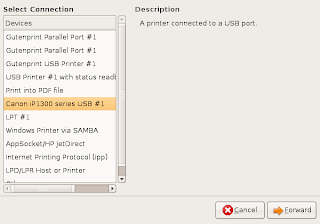
- Open System → Administration → Printing → New Printer, to Select Connection chose Canon ip1300 USB #1 (clicked Forward)
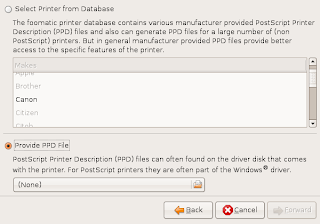
- Printer driver chose Provide PPD file
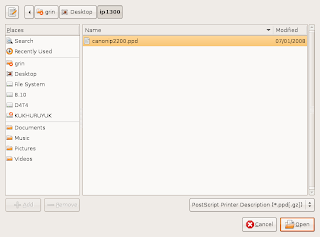
- Aim at to /home/grin/Desktop/ip1300/canonip2200.ppd
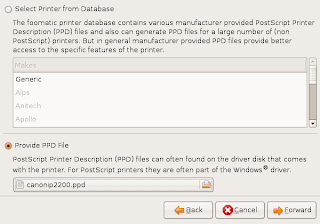
- Choose canonip2200.ppd → Open, so as Provide PPD File contained canon canonip2200.ppd
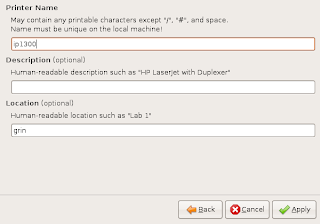
- Give the name of ip1300→ Apply
- Restart computer
- Printer was ready to use
code : sudo dpkg -i *.deb
Learning By doing
Subscribe to:
Posts (Atom)